Showing posts with label project. Show all posts

Tuesday, September 6, 2016

Halloween Apron

After having family visiting us for a week, I was excited to have Labor Day all to myself.  Having spent the week being a tourist or vegging around the house, I really needed to do something productive for my sanity.  Vegging around for a full week is not my idea of relaxing.

Military Mama Musings - Halloween Apron I really wanted to make something.  I think the urge was there to offset the laziness of the prior week. I remembered that a year (or two) ago, I bought some fun Halloween fabric for an apron.  I got two different fabrics so that the apron could be reversible.  I was excited, especially since I recently bought some fun new accessories for my sewing machine and learned how to use the buttonhole and button feet.

In general, I'm in love with my new sewing machine (courtesy of J in the spring), so getting to use it on another project made me very very happy.

Military Mama Musings - Halloween ApronAlthough I do sometimes make my own sewing patterns, this particular apron came courtesy of Jo-Ann's:  I chose the one without the top embellishment, and with only one pocket, because I like to keep my practical clothing simple (bottom left). Though  I did add a lace border.  :-)

With our new living room arrangement, we have plenty of space for me to lay out the fabric, though my cat and dog always want to 'help' when it's least convenient.  Guess it just feels good to mess up perfectly laid out fabric with your claws...  Still, they did eventually let me cut out all the pieces, which luckily was just six:  two sides to the Apron,  two pockets, and the two ties.  Overall, a nice easy project.

Military Mama Musings - Wonder ClipsI really did enjoy using my new Wonder Clips, though they are not going to replace pins for everything.  Still, they went on and off a lot quicker than pins do, and it was much easier to unclip as I was sewing than it would have been to unpin.  They also held the layers in place easily.  And I love the color. Mine were purchased at the local sewing shop, Blue Ribbon Sew, but they are available at Amazon as well.  Will definitely play around with these some more before I decide whether or not to invest in a few more.

The final product came out quite nice.  I love getting to choose the look I want to wear that day, though the apron will be stored till October. It is my grand plan to have one Apron for every month of the year.  So far I have October, November, and December (which I purchased at a local holiday bazaar and which sparked the desire to have a different one for every month).  I also love reversible aprons.  Not only are they thicker and more sturdy, making them feel like they are much higher quality, but they can be worn to mach your mood or to switch to a less stained side around guests.  It is possible I just don't wash my aprons enough...

Military Mama Musings - Halloween Apron

I did try my hand with some pattern matching.  For the pumpkin side, I choose to make the pocket the face of a cat, which obviously breaks the pattern.  For the silhouette side, however, I centered the pocket on one of the silhouettes and then positioned it so that it matches the overall pattern.  It wasn't too hard since I had the freedom to move the pocket around a little to make the pattern match.  I haven't figured out however how I would have done it when the pattern needed to be exact.  Something further research on that is necessary.

Military Mama Musings - Halloween Apron

Monday, August 29, 2016

Book Review - Love the House You're In

"40 ways to improve your home and change your life."

A few weeks ago, when J was gone on a three-week field exercise, I wondered over to a temple of solace, also known as Barns and Noble.  I was feeling sad and restless, missing Jeff, and wanted a new book to keep me company at night.  As I wandered the aisles looking for something to catch my eye, I decided I wanted a book on home improvement.  I was planning spending my free time while J was gone painting, organizing, and rearranging (something that's got the double benefit of being engaging and time-consuming, while being easy to leave at any moment when things come up).  Eventually, I picked up Love the House You're In by Paige Rien.  The book particularly caught my eye because it proposed to change the way you think about your home, and looked to have good advice not just for homeowners, but also for renters.  Since we don't own our house, and since we have a max two years left here in Fairbanks, I had hoped it would have some good tips on what to do without needing an addition or to tear out a wall.


Well, I was not disappointed.
This book is divided into 5 sections, each looking at a different aspect of the home.  The first two sections are all about reflection.  The third is about 'style'.  It's in quotations marks because the author hates the word style and what it implies.  The last two contain practical advice about decorating a house.  Overall the book covers every type of room and every big decision that needs to be made.  There is advice on elements of entry, on lighting and paint colors, additions and throw pillow.  For such a short book, it really has everything.

Here are the parts of the book that were most helpful for me:

  • Part One:  So, Who are You?
    I know it's kind of cheating to have the entire first section be the number one helpful thing, but this section is exactly what makes this book unique.  It doesn't ask "do you like traditional furniture?" or "What is your budget?"   Instead, the chapter goes through different aspects of a person's history and identity, such as travel, hometown, faith, etc.  As such Paige asks us to think about who we are, so that when we get to  actually changing our home, we have a firm grasp of the things that make us happy, so that we may show them off in our home.  This chapter inspired me to take out a tile we received at our wedding from storage.  This tile says "happiness is being married to someone Polish"  and has a couple in traditional Krakow dress kissing on it.  I always liked it, but never displayed it because its traditional look never fit in with the modern style I knew I liked.  But I realized that it was one of the few things we have that marks my heritage, and that is important to me.  
  • What Do You Love about Your House?
    This chapter of section two asks you to list at least 5 things you love about your house.  It asks you to come up with this list fast.  If something pops into your head, it should probably be on the list.  Don't choose things that you think you should like, and don't list anything too broad.  Stick with specifics.  For me this was easy.  The things I currently love about my rental are
    1.  The view of the mountains from the balcony on a clear day
    2.  The bookcase in the living room where all the books are organized by the color of the spines
    3.  The painting J and I bought in Anchorage last Spring
    4.  The many house plants that line our windowsills
    5.  The print of J and I that was signed by guests at our wedding.
    The list was easy.  The first thing it made me realize is that I wanted to bring many more plants into our bedroom, which at the time only had three.  I detail the results of that search here.
    .
    Military Mama Musings - Rainbow Bookcase
  • What's Your Real-Estate Story
    What I really gained from this part of section two, is how important it is to ask this simple question:  Will you be at this home for more than 5 years.  In our case, the answer is no.  I know we'll be moving in about two years.  This is not a "forever" home for us.  Paige here makes a statement that was a surprise for me, but that I loved.  If you're not in a forever home, don't wait.  You're not going to take up huge projects such as an addition if you're not there forever, but you can do a lot of small things now, and enjoy them for the few years you will stay in the house.  I loved the advice.  I repainted a spare bedroom I hated that was acting as storage outside of the one month a year where we have family visiting and changed in into a "me" room, complete with a sewing corner, a hammock for reading, and of course, lots of plants!
  • Welcome yourself Home: Entryways
    I never loved the way our home entry was set up.  The first flat surface I came to when entering the home was J's desk.  The second was our living room table and chairs.  As a result, both places were always covered with junk mail, purses, coats, and shopping bags.  J hated it since his desk is his sanctuary.  Paige gave a few pointers on how important it is to not only have a designated space for all that stuff, but also how nice it is to have something you love be the last thing you see when you leave the house, and the first thing you see when you enter.  I rearranged some of the living room furniture, and now we have a functioning entry way!
I highly recommend this book to anyone who is not quite satisfied with their home, and who feels lost in all the decisions that could possibly be made!


Tuesday, August 23, 2016

Vertical Garden - How to squeeze just a few more plants into the bedroom!

A few weeks ago I read a great book, Love the House You're In.  It really made me think about the aspects of the rental that I love, and on top of the list is ALL the plants that we have.  I have two balconies, and several south facing windows, all of which are covered by plants.  In fact, the only rooms of the house that don't have any houseplants are the walk in closet and the two bathrooms (none of which have any windows.)  


Anyway, I decided that I needed more plants in my bedroom.  All I had in there was a small snake plant* I placed on J's nightstand (it's my way of saying "I love you" since snake plants are known to clean the air at night), a large-ish  Bird of Paradise that was doing OK, but had never flowered, and a Norfolk Island Pine (I think) that Jeff got me around last Christmas.  Now the latter two are fairly large plants, but I wanted a massing somewhere in the bedroom instead of just single specimens.  


Military Mama Musings - Snake Plant/Mother in law's tongue

I did a little research on indoor vertical gardens, and there are some amazing ideas out there, both ready to buy products, and DIY tutorials.

The first one I found was a beautiful Smart Wall from G Sky.  It has the benefit of being an all in one product, comes fully assembled, and has drip irrigation installed.  All you do is add 96 4" plants and enjoy!  Unfortunately at $1499 it was a bit out of my price range.  Still, it's a beauty!
Military Mama Musings - Smart Wall by G Sky


There was also this smaller Vertical Succulent Frame from Succulent Wonderland at Etsy.  It had a great place to put in a larger plant, and the cost of $96 included the succulents in the top corner.  It was definitely worth the price, but it didn't quite fit into the look of our bedroom.
Military Mama Musings - Vertical Succulent Frame from Succulent Wonderland at Etsy


A DIY Succulent Frame from Balcony Garden Web looked like jus the thing.  I could make it in a style that fit the look I wanted and still have vertical plantings.  Until I realized that my bedroom, especially in the winter, simply does not get enough light to support succulents.  I didn't want to install a special light for them, and I was afraid that with the mold problems constantly present in Alaska, it would not end up well for me.  


Clearly, I needed something that would work for less light loving plants.  This DIY wood and leather trellis plant wall looked perfect.  I could make it, and it could be taken off the wall to come with me when we move in a few years.  I loved the look  and the fact that I could paint the pots and trellis to work with the colors of the bedroom.  I realized, however, that my bedroom just does not have this much wall space, at least not where there is any light.  Next house maybe...
Military Mama Musings - Trellis Plant Wall


These Macrame Hanging Planters just looked beautiful.  They all came from Chiron Creations on Etsy, and some amazing person hung a dozen or so of them, all in different shades of blue and green, in a row.  It looks spectacular.  However, you once again need some blank wall space, and I didn't want to spend so much money on my last minute project.  This is once again a project for the next house.

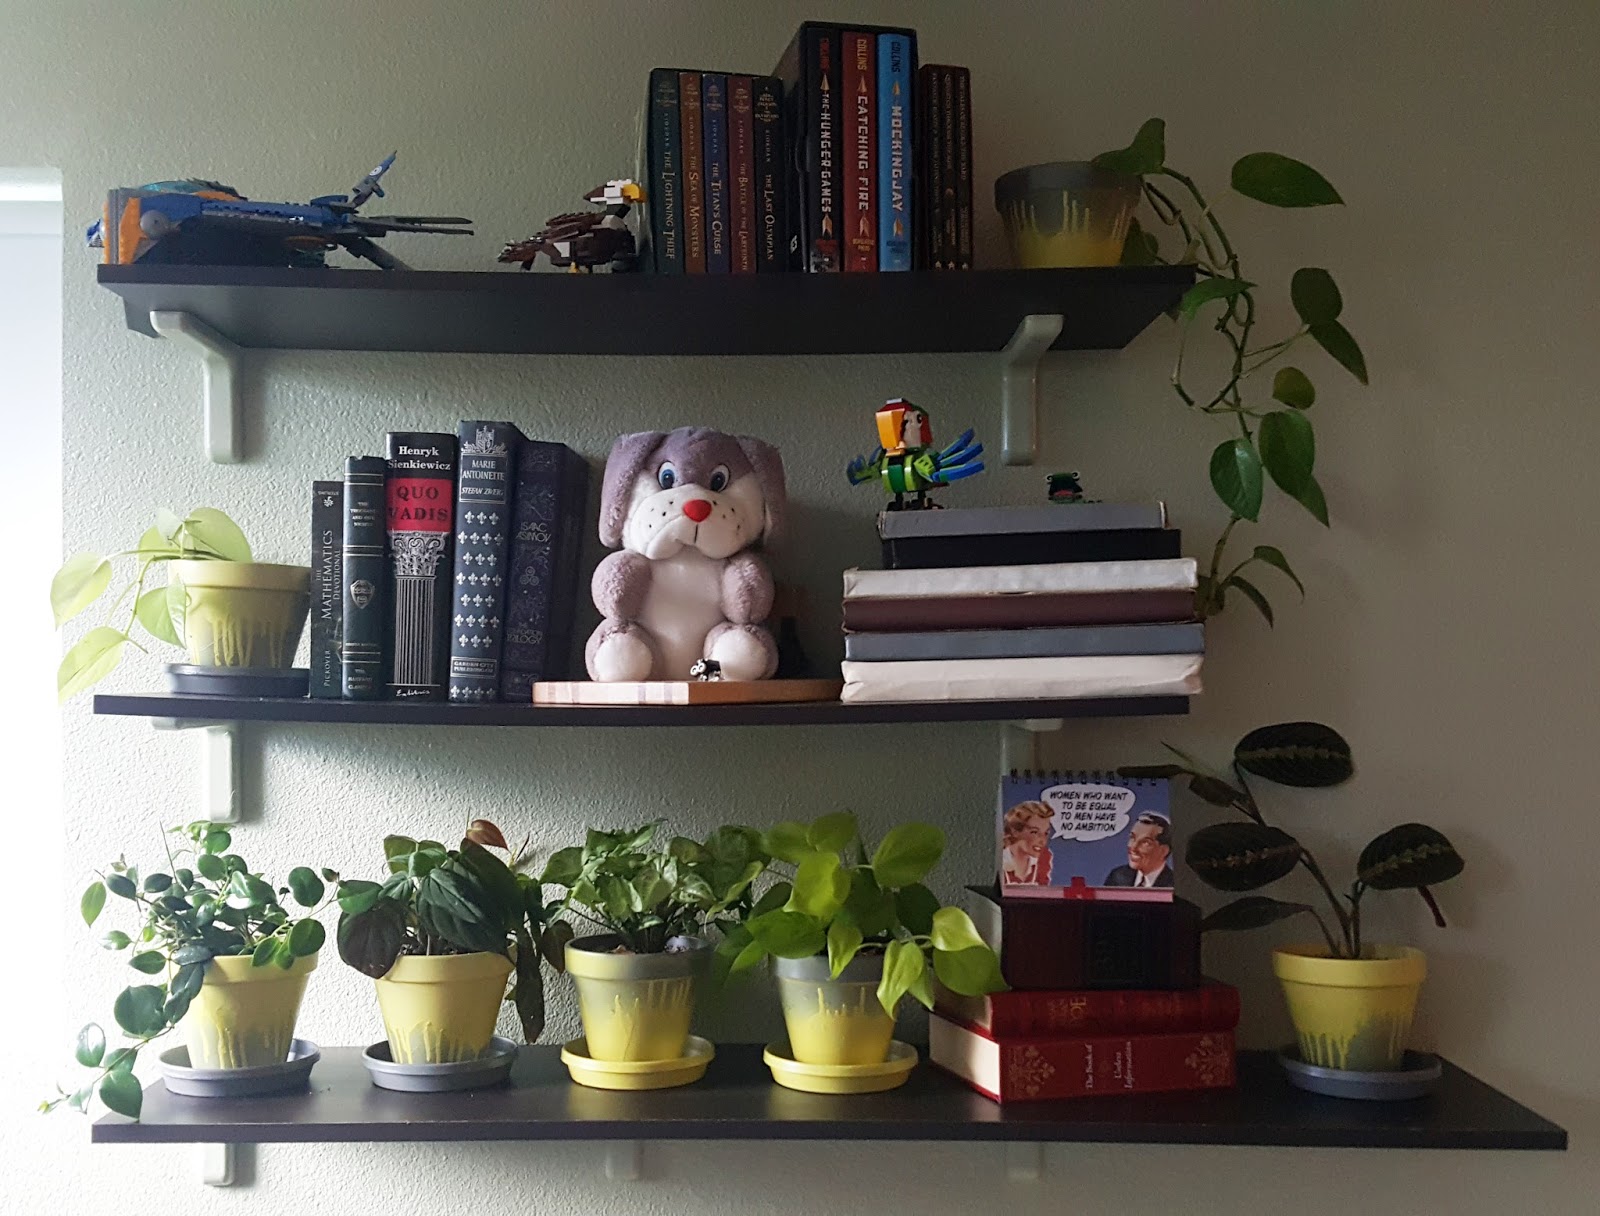
I finally found something that would work for me at M-Pression.  Instead of a complicated design, why not fill an entire shelf with cascading plants?  There are tons that are OK with low light conditions, some neglect (I'm not the best at regular watering, and it usually takes me months to get a plant to thrive), and I already have shelves in the bedroom!


I just loved this look.  I took some inventory of the plants that I had available that would propagate easily.  I had two kinds of photos in the house, which love low light, and are hanging.  Then I went on an online shopping spree at Hirts Gardens over at Etsy.  The choices were great (I decided to stick with one store so that I didn't have to pay too much extra shipping since shipping to Alaska can get quite expensive), and I ended up ordering four new plants:


  • Lemon-Lime Vining Philodendron: an easy hanging plant that's my favorite bright shade of green
  • Mona Lisa Lipstick Plant: this one was supposed to be easy and I couldn't resist the bright red flowers
  • Velvet Leaf Bronze Micans Vine: Interesting green/red foliage, also a philodendron, and it's a hanging plant too!
  • Red Prayer Plant:  this one is not a hanging plant, but I had hoped it would offset the other plantings nicely

Military Mama Musings - Houseplants

I bought a whole bunch of 5" clay pots, and spray painted them yellow and gray.  I did a horrible job, and the paint dripped all over itself.  Since in the back of my head we have a "less than two years at his place" mentality, I decided to just embrace the drips as part of the look, and in fact sprayed some more to get even more drips.  


The plants arrived in a few days and looked like this:

They were packaged very nicely, and in fact were much bigger than what I expected to get with 4" pots.  Very exciting!

I planted them all, including the two pothos plants in the 5" pots.  The result is quite nice, though lacking in the 'vertical' aspect.  But that's the thing about working with plants.  They look significantly better after you've given them some time to grow!


Military Mama Musings - Future Vertical Green Wall


*SIDE NOTE:  Snake plant, or Sansevieria trifasciata, is also called mother in law's tongue.  It is a name I prefer since it paints a nice picture:  the leaves have very sharp edges, and like the  proverbial mother in law, will cut you up if not careful.  However, since my mother in law is a lovely sweet person, I always feel guilty falling back on that name, so Snake plant it is.  

Wednesday, August 17, 2016

Choosing Paint - a few tips

Military Mama Musings - Choosing Paint: a few tipsI assume most people have painted a room at some point in their lives.  Maybe you just 'helped' choose the color as a kid, or maybe you're that crazy person (and I include myself in the description) who decided to repaint their first apartment from top to bottom, and then had to paint it all back before moving out?  Either way, almost everyone knows that most of the time, choosing a paint color can be a daunting process, and it's certainly not one that should be rushed.

Now, I am not an expert on this by any means.  I am not a color theorist, not an interior designer, and I don't have tetrachromacy (though I really wish I did).  I do however love color, decorating, and am frequently asked by friends to help them choose a color for their house.  I also love to research colors, how the appear with different light types and temperatures, and most of the time I think the colors I've chosen have worked great in the space.  My friends sometimes agree and sometimes don't, but as I learned in a recent book I read, Love the Home you Have,  don't rely on friends to give you your own color preference, and don't worry if they don't like what you chose!

Now, everyone has their own way of going about picking colors.  I used to be the go to the store, pick a color, buy the paint, and have a painted room two days later.  I was lucky and hadn't picked out anything so obnoxious I couldn't live with it, but I've had my hits and misses.  The shade of green in our bedroom is still just a tad bit too cool to work well with the warm brown of our furniture.  I also spend five years in a bedroom whose lavender color went from cool blue to bright pink depending on the light, time of day, and season.  The blue wasn't a problem, but the pink drove me crazy when I was unlucky enough to be home during those few hours when the afternoon sun squeezed in between my house and the next door neighbor and shone a two-foot wide swatch through the narrow window.

I have since developed a few steps I try to follow when choosing paint.

Military Mama Musings - Choosing Paint: a few tips

  • Spontaneous Painting will NOT get you a reliable result
    This one is really hard for me, because most of my projects start in a whirlwind of activity where I decide that I must, RIGHT NOW, start this awesome thing.  I usually have an idea, and I want to execute it while I have the drive and energy.  It works great for some things.  I've cleaned the garage in one day, made a baby blanket, and put together our yearbook this way.  But I've managed to tell myself that painting is a task I cannot get started on whenever the urge strikes me.  Instead, I tell myself to channel that first burst of energy into picking a color.  
  • Don't limit yourself when selecting swatches
    Paint looks different in the store than it will in your house. Therefore, you cannot really judge a paint color by the way it looks on a well-lit wall in Home Depot (or your paint store of choice).  There are some judgments that you can make.  First, if you hate a particular hue (I really am not a fan of pink), you can be fairly certain that you will not come to love if you surround yourself with the color.  Second, you probably know how intense of a color you will be happy with.  Some people love bright colors on their walls, others know they want a more subtle or neutral shade.  There is no need to look at the Sunshine Yellow if you know you are looking for something off-white.  Similarly, don't look at pastels if you know you want a dark maroon wall. Third, if there are restrictions of what color you can choose, like your landlord saying "neutrals only" or your child asking that her room be painted blue, there is no need to get colors that don't match that description.
    Outside of that, get all the samples that meet your color choices.   I usually know a general color I want to paint (a green bedroom, a gray craft room, white trim, etc.) so I only get colors that match that general idea.  I like to get both warm and cool shades of each color because I have been surprised before at what worked well with my current carpet and light at my house.  For my last painting project, a spare bedroom turned into a getaway for me, I had over 50 shade of gray (no pun intended) in my original choices.  
  • Eliminate obviously wrong shades in the space to be painted
    Lay out all of your paint choices in the room you'll be painting.  Put aside any that you immediately know do not work.  These are the colors that clash with your furniture, look like vomit in the light, or blend so much with the carpet you cannot tell where one started and the other began (unless of course this is a look you're going for.)  I find that the first elimination to be pretty easy.  Don't worry about throwing away a "perfect" shade by accident:  if there is something you dislike about it at first glance, it'll never grow on you.
  • Eliminate until you have 3 or 4 shades left
    Hopefully, your first elimination round got rid of a dozen or two.  Either way now is the time to eliminate.  Get rid of any color that's too dark (this one is usually pretty easy).  Get rid of any color that's too cool or too warm.  This one can be tough for people who do not do well with warm/cool colors.  Warm colors have undertones of red, yellow, or orange.  Cool colors have undertones of blue or green.  Purple undertones can be either cool or warm.  Some rooms, especially empty ones, can lend themselves to either warm or cool shades, but in most cases, you want to match coolness or warmness to your carpet or furniture.  This will usually eliminate half of the paint chips you have left.  After that it gets harder, but I usually just put away any paint that I don't like, no matter how trivial the reason (except the name of the paint, do not use the name of the paint for any reason, they don't mean anything).  Keep eliminating until you have 4 shades.  Then, unless you are really going for bold, eliminate the darkest one.  I will often keep the darkest shade if I'm painting the room more than one color, but for a single color, eliminate it.
  • Look at your chosen swatches in different lights, on different walls, and at different times of day
    I usually throw the swatches on white paper to eliminate the interference of the existing color (this is not always needed if the existing walls are a neutral white).   I use sticky tack to put them on the walls (not right next to each other), and every time I pass by the room, I look at them.  It takes me at least two days, and usually a week, but by then I have usually found a color I liked.
    If you have a hard time visualizing the color from a small paint swatch.  If that's the case, buy sample paint colors of your choice and paint a 2' x 2' (or bigger) swatch on your wall.  don't put the samples right next to each other and make sure you put them in a spot that has a lot of light changes.  Alternatively, paint boards, so that you can move the paint swatch around the room.  Remember to put something white in the back.  
  • Choose your paint
    Hopefully, a color or two has presented itself.  If i can't decide between two colors, and they work together, I will sometimes use both, especially on different walls.  If you really can't choose, flip a coin.  After all, paint is not a permanent decision you have to live with for the rest of your life.  

Monday, July 25, 2016

Baby Shower - Guitar Gift

A few weeks ago I attended a baby shower for a good friend here in Alaska.  She is having a little boy, and we had a bit of a fox theme going with the gifts.  I'm not sure if that's a decision she consciously made for her nursery and the baby, or if the fact that the invitation had a fox on it made everyone assume that a fox theme was in the works.  Here is a lesson learned for everyone:  If your baby shower invitation has an obvious theme, it can drive the gifts, so send one that matches your decor or one that's neutral enough to not inspire gift ideas!

I knew I wanted to package the gifts in a fun way, like a diaper cake, but different.  However, this inspiration did not strike me until after I bought all the gifts, so I had to find something that would work with the gifts I had, and also something that would work for my friends.  I ended up going with a guitar since the father of the baby is a musician.  It turned out to be a surprisingly easy to accomplish project.  Other than the gifts all I needed was some ribbon and safety pins to hold it all together.

Here are the gifts I had to work with:


A baby thermometer
That is not my fox - baby book
Fox costume (for newborn pictures)
A package of Honest Company newborn Diapers
Two pairs of baby leg warmers (one fox theme that I bought, and one that I crocheted)
Best Bottom Diaper Shell (with foxes)
A Fox themed receiving blanket
Paris themed swaddle

I didn't watch a tutorial (though there are plenty on youtube if you are interested), but I did find great examples of guitar shaped gifts (see my pinterest below).

I took the box with the thermometer and covered the bottom with the diaper cover, and the top with the fox costume (stuffed the bottom of the costume into the top) to give it a round shape.  I then took the diapers and layered them around the box to make a vague oval.  Using ribbon I tied the whole thing together, then wrapped the swaddle around it.  There was a bit of stretching and pinning to get this step to work.  I folded the receiving blanket until it resembled a long stretch of fabric about the same width as the whole diaper/swaddle assemble.  I used a ribbon  tie it just above the center to make the guitar 'pear shape' then wrapped more ribbon along the edge.  I cut a piece of cardboard to make the guitar neck, and stretched the leg warmers over it, wrapping it with more thin ribbon.  Then I wedged the book and 'neck' under the previously tied ribbon.

The final gift came out like this:


Check out more baby shower ideas on my Pinterest board here (and fair warning, I'll be throwing a dinosaur themed shower in a few months, so there may be a lot of dinosaur things popping up!):

Pinterest-Baby Shower 

Tuesday, July 19, 2016

Three Week Home Makeover

So J left for three weeks out in the field, and I've gone on a bit of a house-frenzy.  Now cleaning would seem like a logical first step, but no,  I've gone straight to painting.  While he's gone, I want to paint all the doors in the house, the spare bedroom, and the upstairs bathroom.  Maybe the downstairs bathroom too, but that would involve moving the new washer and dryer, and that may be too much for me.  Unfortunately, J hates large house projects, especially in a rental, so I may not be able to get his help moving the appliances, but we'll see.  I've spent most of last week choosing various shades of gray and white and off-white for this project.  Normally I love lots of bright colors, but this is a rental, so I'm just glad that my landlady is letting me paint at all!  She said yes to neutral colors and asked us to keep all doors and trim white.  I'm happy to get to put a fresh coat of paint on everything and to get rid of at least some of the weird pink creme color that my entire house is painted.  The pink/red undertones don't match ANYTHING, including the tile, the carpet colors, or the counters.  I think the last realtor choose it.

Colors to come soon!  Also, some lessons learned from the whole project.  Biggest lesson so far?  If the door is already tight in a frame, sand a bit in that area, because after you put on two more coats of paint, the door won't close anymore.  Also, if your hinges use more than one type of screw, keep track of which screw goes in which hole, or just buy a whole bunch of longer screws, so you're not trying to screw a tiny screw into a large hole.